

Core Mechanics and Pre-Ignite Strategy
Mavuika's a 5-star Pyro Claymore Main DPS with Level 90 stats: 12,552 HP, 359 ATK, 792 DEF, 88.4% CRIT DMG. Her Burst Hour of Burning Skies consumes 50% Fighting Spirit for massive AoE Pyro damage and Crucible state. Tap Skill summons Ring of Searing Radiance for off-field Pyro damage; hold Skill summons Flamestrider for Nightsoul-aligned attacks.
Pre-ignite strategy maximizes damage before the Crab activates defensive mechanics. Execute Mavuika's Burst and Charged Attacks during initial vulnerability for 1.5x Melt multiplier before the boss converts Hermit Seeds into Bloom shield. Essential against 10M HP with 420-second timer.
For affordable crystal acquisition, genshin crystals buy for f2p mavuika melt rotations through BitTopup ensures competitive pricing and instant delivery.
F2P Viability
C0 viability stems from innate CRIT DMG ascension and Obsidian Codex 4-piece compatibility. This set grants +15% Nightsoul on-field damage and +40% CRIT Rate for 6 seconds, solving F2P CRIT Rate deficits. With 4-star weapons like Serpent Spine (510 ATK, 27.6% CRIT Rate) or Fang of the Mountain King (510 ATK, 11% CRIT Rate), she reaches 60-80% CRIT Rate for consistent Floor 12 clears.
Talent priority: On-Field Burst > Skill > Normal Attack. Fighting Spirit synergizes with Natlan teammates like Kachina, generating Nightsoul points without expensive 5-star supports.
F2P investment: ~7M Mora for Level 90 with 60-80% CRIT Rate, 160-200% CRIT DMG through Obsidian Codex farming with ATK%/EM Sands, Pyro DMG Goblet, CRIT Circlet.
Pre-Ignite Explained
Pre-ignite = max Melt damage before enemy defenses activate. Floor 12-2 Crab starts shielded, spawns Hermit Seeds. Converting 6 Bloom Seeds breaks shield and reduces RES by 40%; failing gives +70% RES.
Optimal sequence executes Mavuika's full Burst before Crab converts Seeds. Window lasts 8-10 seconds from engagement. Tap Skill before Burst to trigger Obsidian Codex's +40% CRIT Rate buff.
Kaeya's Burst Glacial Waltz provides consistent off-field Cryo (15-second duration), maintaining aura through Mavuika's Crucible state. Aim for 3-5 Melted hits, achieving 200k-350k damage depending on investment.
Why Melt for 10M HP Crab
10M HP pool + 420-second timer = 23,800 DPS check. Melt's 1.5x multiplier provides needed scaling with F2P stats. Unlike Vaporize (2x Hydro on Pyro), Melt applies to Pyro on Cryo, aligning with Mavuika's kit.
Strong Pyro from Mavuika's Burst consumes weak Cryo aura, triggering Melt without removing aura entirely when timed right. Kaeya's Burst maintains persistent Cryo. ICD permits Melt on every third hit = 2-3 amplified strikes per Burst.
Version 6.2 Abyss (Dec 16, 2025 - Jan 16, 2026) emphasizes Pyro Melt strategies for second half, synergizing with Mavuika's front-loaded damage.
Floor 12-2 Boss Analysis
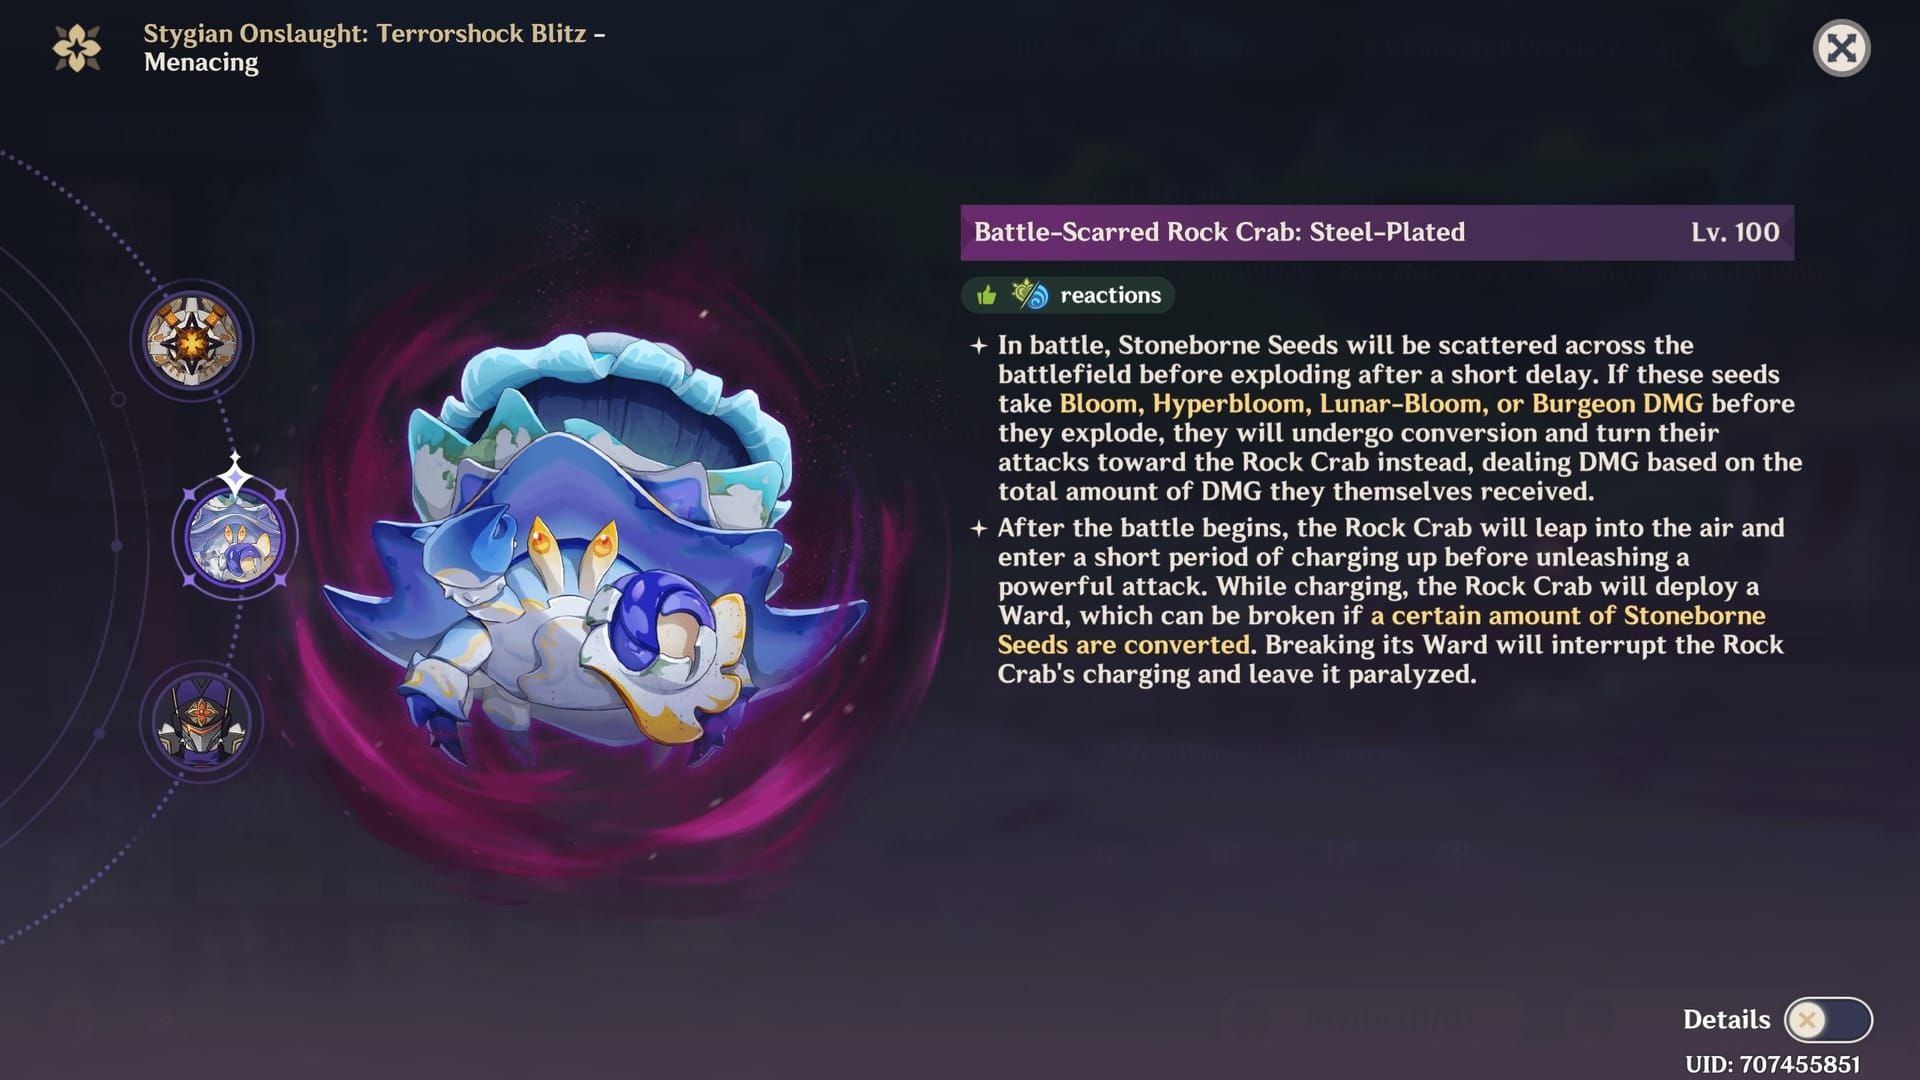
Battle-Scarred Rock Crab spawns Hermit Seeds, converting into Bloom shields reflecting 500% damage (max 1.5M reflected). Boss starts shielded—convert 6 Seeds for -40% RES or brute-force through +70% RES.
Phase transitions at ~70% and 40% HP with brief invulnerability while summoning Seeds. Track thresholds for proactive energy funneling.
Attack Patterns
Three primary attacks:
- Horizontal claw swipes: 2s windup, 4s vulnerability window
- Ground pound AoE: 3s windup, 5s vulnerability (requires repositioning)
- Bubble spray: 1.5s windup, applies Hydro (interferes with Melt)
Optimal DPS window: after ground pound recovery (5s grounded). Bait pounds at mid-range (8-10m) for predictable patterns.
Phase Transitions
First transition (70% HP, ~90-120s): Burrows 8s, spawns 4 Seeds. Resets Fighting Spirit—Kachina rebuilds for second Burst. Pre-transition energy funneling through Bennett ensures Burst availability.
Second transition (40% HP): 10s invulnerability, spawns 6 Seeds. Requires 60-70% Fighting Spirit entering phase through consistent Kachina Skill usage.
DPS benchmarks: 70% HP by 120s, 40% HP by 240s, leaving 180s for final burn. Falling behind 30+ seconds = failed clear.
Abyss Blessing 6.2
Blessing enhances Pyro/Burst damage (15-25% boost). Multiplicatively scales with Mavuika's Goblet bonus, allowing lower investment thresholds (150% CRIT DMG achieves 170% CRIT DMG clears).
Blessing lasts 10-15s after Burst, aligning with Crucible duration. Coordinate Bennett's Burst before Mavuika's for stacked buffs, improving clear times by 20-40s.
Optimal F2P Teams
Structure: Mavuika (Main DPS), Cryo Enabler (Melt trigger), Bennett (ATK buffer/healer), Natlan Teammate (Fighting Spirit).
Most accessible: Mavuika, Kachina, Kaeya, Bennett—all obtainable through standard wishes/events.
Alternative: Mavuika, Kaeya, Rosaria, Sucrose, Bennett (trades Kachina for VV shred).
For resource management, secure genesis recharge for duolingo collab at BitTopup offers fast delivery.
Core Roles
Mavuika (Main DPS): 70-80% field time during Burst. Crucible lasts 7.5s with Pyro-infused attacks. Burst talent to Level 8 minimum (9-10 recommended).
Cryo Enablers:
- Kaeya: Glacial Waltz applies Cryo every 2.5s (6 instances per 15s duration). Near-permanent uptime with 160-180% ER.
- Rosaria: Ravaging Confession offers burst Cryo + CRIT Rate sharing (12% of her CRIT Rate). 8s duration creates 7s gaps but faster tick rate (every 2s).
Bennett (Buffer/Healer): Fantastic Voyage grants 56-119% base ATK buff. Equip high base ATK weapons (Aquila Favonia, Prototype Rancour). Noblesse Oblige 4pc adds +20% ATK.
Flex (Kachina): Generates Nightsoul points via Skill, converting to Fighting Spirit. Skill to Level 6 ensures adequate generation.
Kaeya vs Rosaria
Kaeya: 15s Burst, 15s CD = near-permanent uptime. Follows active character. Safer for learning rotations. Generates 2-3 particles on 6s CD.
Rosaria: 8s Burst, 15s CD = 7s gaps. CRIT Rate buff (12% transfer) stacks with Obsidian Codex for 90%+ CRIT Rate. Faster tick rate matches Mavuika's attack speed. Generates 3-4 particles on 6s CD.
Choose Kaeya for consistency, Rosaria for 5-10% damage optimization after mastering timing.
Budget Supports
Charlotte: Hybrid Cryo enabler/healer. Lower application rate than Kaeya—suboptimal for Melt unless healing essential.
Chongyun: Cryo infusion interferes with Mavuika's Pyro Burst—disqualified.
Kachina: Turbo Twirly generates 60-80 Fighting Spirit per cycle. Skill to Level 6 minimum.
Sucrose: VV 4pc provides -40% Pyro RES + EM sharing (20% of her EM). Full EM build (EM/EM/EM) grants Mavuika 150-200 EM for 15-20% Melt damage increase.
Energy Requirements
Mavuika: 50% Fighting Spirit (not ER-dependent). Kachina generates 60-80 per cycle.
Bennett: 180-200% ER for Burst uptime. Skill generates 2-3 Pyro particles on 2s CD (tap) or 4s CD (hold). Favonius Sword reduces to 160-170% ER with 30-40% CRIT Rate.
Kaeya: 160-180% ER for 15s Burst uptime. Skill generates 2-3 particles on 6s CD.
Rotation flow: Kachina Skill → Kaeya Skill + Burst → Bennett Skill + Burst → Mavuika Skill + Burst.
Step-by-Step Rotation

Standard sequence (18-22s cycle):
- Mavuika tap Skill
- Kachina Skill activation
- Kaeya Skill → Burst
- Bennett Burst → Skill
- Mavuika Burst → Charged Attacks
Adapt based on energy/boss patterns. If Bennett Burst on CD, delay Mavuika Burst 2-3s—damage loss from unbuffed hits exceeds wait time.
Pre-Rotation Setup
- Mavuika tap Skill: Activates Obsidian Codex +40% CRIT Rate (6s). Execute ≤4s before Burst for buff overlap.
- Kachina Skill: Summons Turbo Twirly. Wait 1-2s for Nightsoul generation before swapping.
- Kaeya Skill → Burst: Generates particles, applies Cryo. Position within 8m of Crab.
- Bennett Burst → Skill: Activate 1-2s before Mavuika swap. Stacks Bennett ATK + Noblesse ATK + Obsidian CRIT Rate.
Exact Timing
Mavuika Burst within Bennett's circle (7m radius). Crucible lasts 7.5s: execute 3-4 Normal Attack chains (4 hits each) + Charged Attacks. ICD allows Melt on 3rd/4th hits every 2.5s or 3 hits.
Charged Attack timing: execute after 4th Normal Attack. Consumes 40 stamina—limit to 3-4 per Burst with full stamina. Avoid unnecessary dodges during setup.
Target 4-6 Melted hits per Burst: 2 from Normal chains + 2-3 from Charged Attacks. Kaeya's Burst applies Cryo every 2.5s, syncing with attack speed.
Monitor Cryo aura (blue indicator). If disappears mid-combo, execute one Normal Attack to re-apply Pyro, resume Charged Attacks after Kaeya's next tick.
Animation Canceling
Dash-cancel Charged Attacks: Saves 0.3-0.5s per cancel (1.5-2s total). Execute Charged Attack → dash forward on damage registration. Reserve 20-30 stamina for dodges.
Jump-cancel Normal chains: Skips 4th hit recovery (0.2s per chain). Execute 4th Normal → jump → Charged Attack during jump. Increases chains from 3-4 to 4-5 per Burst.
Swap-cancel Bennett Skill: Saves 0.5s per rotation. Execute Skill → swap as particles appear (~0.3s).
Don't cancel Mavuika's Burst animation (removes i-frames) or Kaeya's Burst (prevents Glacial Waltz spawn).
Energy Adjustments
Bennett Burst on CD: Extended setup—Kachina Skill (extended) → Kaeya Skill x2 → Bennett Skill x2 → reassess. Generates 8-12 particles in 4-6s. Unbuffed Burst deals 40-50% less damage.
Energy deficit at transitions: Execute Bennett Skill 2-3x during final 10s before transition, banking energy for post-transition Burst.
Fighting Spirit shortfall (40-45%): Extend Kachina field time 2-3s or execute Mavuika hold Skill for Flamestrider (sacrifices 3-4s DPS).
Emergency recovery: Kachina → Kaeya Skill spam → Bennett Skill spam → rebuild 10-15s. Tolerates one recovery max—two+ = insufficient ER.
Weapon and Artifact Optimization
Top 3 F2P Weapons
Serpent Spine (R1): 510 ATK, 27.6% CRIT Rate, 30% DMG (50% at R5). ~45k avg Burst hit (52k at R5). Loses stacks on damage—requires careful dodging.
Fang of Mountain King (R5): 510 ATK, 11% CRIT Rate, 24% DMG post-Nightsoul Burst. ~42k avg Burst hit (7% below Serpent R1). Craftable, guaranteed availability.
Prototype Archaic (R5): 510 ATK, 41.3% ATK%, 480% ATK proc every 15s. ~38k avg Burst hit (15% below Serpent). Requires heavy CRIT Rate investment.
Ranking: Serpent R5 > Serpent R1 ≥ Fang R5 > Archaic R5. Gap between Serpent R1 and Fang R5 narrows to 5-7% with optimal substats.
Artifact Sets
Obsidian Codex 4pc: +15% Nightsoul on-field DMG, +40% CRIT Rate (6s). Solves CRIT Rate deficit. Effective 55% CRIT Rate value (40% CRIT Rate ≈ 80% CRIT DMG).
Crimson Witch 4pc: +15% Pyro DMG, +7.5% per Skill (max 22.5%). Underperforms in burst rotations—only 22.5% Pyro DMG vs Codex's 55% CRIT Rate value.
Emblem 4pc: Converts ER to Burst DMG (max 75% at 300% ER). Inefficient—Mavuika bypasses ER. Falls 20-30% behind Codex.
Mixed sets: Crimson 2pc (+15% Pyro) + Gladiator/Shimenawa 2pc (+18% ATK). Transitional option, 15-20% less damage than Codex 4pc.
Main Stats
Sands: ATK% (46.6%) with Bennett, EM (187) with Instructor/Sucrose. ATK% for multiplicative scaling with Bennett's flat buff. EM increases Melt by ~28%.
Goblet: Pyro DMG% (46.6%). Off-set acceptable—prioritize Pyro DMG over set bonuses.
Circlet: CRIT DMG% (62.2%) with Obsidian + Serpent (67.6% CRIT Rate before substats). CRIT Rate Circlet with Fang/Archaic.
Substats: CRIT DMG% = CRIT Rate% > ATK% > EM > ER%. Target 15-20% CRIT per artifact (3-4 rolls). ATK% 4-6% per roll, EM 16-23 per roll.
Minimum Thresholds
Floor 12-2 success: 60% CRIT Rate min, 160% CRIT DMG min, 2000 total ATK with Bennett. Ensures 40k+ avg Burst hit (60k+ Melted) for 23,800 DPS check.
Obsidian reduces CRIT Rate needs to 20-30% from artifacts (+40% from set). Serpent contributes 27.6%, leaving 2-12% from substats (1-2 rolls).
CRIT DMG 160-200% demands 4-5 rolls per artifact (6-7% each). Circlet provides 62.2%, Mavuika ascension 88.4%, leaving 10-50% from substats (2-7 rolls total).
ATK 1400-1600 base, reaching 2000-2400 with Bennett (+800-1000 at Talent 9) + Noblesse (+20%). ATK% Sands 46.6%, substats 15-25% total.
Energy Management
Mavuika's Fighting Spirit eliminates ER needs. Supports require: Bennett 180-200% ER, Kaeya 160-180% ER, Kachina 0% ER.
Bennett's tap Skill generates 2-3 Pyro particles every 2s. Kaeya's Skill produces 2-3 Cryo particles every 6s. Favonius weapons contribute 1.8 energy per neutral particle to off-field characters.
Execute support Skills on-field 1-2s for particle absorption before swapping. Premature swapping reduces energy by 33% (off-field 0.6x vs on-field 1.0x).
ER Calculations
Bennett (60 energy, 180% ER): Needs 20-24 particles per rotation. 3-4 tap Skills (6-12 particles) + team funneling (8-12 neutral). 15s CD aligns with rotation.
Kaeya (60 energy, 160% ER): Needs 22-26 particles. 2-3 Skills (4-9 particles) + funneled neutral. 15s CD, 15s duration = zero downtime.
Formula: Required Particles = Burst Cost / (1 + ER% - 100%) / Particle Energy Value.
Test rotations on Floor 12-1. If Bursts on CD for 2-3s after rotation, reduce ER 10-20%. If lacking energy at CD expiration, increase ER 20-30%.
Particle Strategies
Favonius Sword (Bennett): Generates 3 neutral particles per CRIT (50% proc R1, 60% R5, 12s CD). Build 30-40% CRIT Rate for consistent procs (0.25 particles/s). Reduces ER from 200% to 160-180%.
Kaeya Skill: 6s CD allows 2-3 casts per rotation (4-9 Cryo particles). Execute Skill → Burst → Skill for max generation.
Kachina: Generates Nightsoul points, not particles. Zero team energy contribution—teams must compensate with higher ER.
Timing: Kaeya Skill (2-3 particles) → Burst → Bennett Skill (2-3 particles) → Burst → Kachina → Mavuika. Generates 4-6 particles during setup + 2-3 from Bennett's second Skill = 8-12 total.
Energy Deficit Fixes
Kaeya shortfall: Skill → wait 6s → Skill again (doubles particles from 2-3 to 4-6). 6s extension delays Burst but ensures Cryo uptime.
Bennett shortfall: Tap Skill 3-4x rapid succession (2s CD, 6-8s total, 8-12 Pyro particles). Pair with Favonius for 11-15 total. Sacrifices 6-8s but guarantees Burst.
Fighting Spirit deficit (40-45%): Extend Kachina 2-3s for +5-10% Spirit, or Mavuika hold Skill for Flamestrider.
Emergency recovery: Kaeya Skill spam (2-3 casts) → Bennett Skill spam (3-4 casts) → Kachina extended → reassess. 15-20s rebuild phase. Tolerates one max.
Advanced Optimization
Elemental gauge: Kaeya applies 1U Cryo every 2.5s. Mavuika's Normal Attacks apply 1U Pyro (consumes 1U Cryo, triggers Melt). Charged Attacks apply 2U Pyro (consumes 1U Cryo for Melt, leaves 1U Pyro aura).
ICD: 2.5s or 3 hits. Normal Attack chain (4 hits in ~2.0s) triggers on 3rd hit. Charged Attacks have independent ICD.
Snapshot: Bennett's Burst snapshots on Mavuika's Burst activation (maintains ATK even outside circle). Obsidian Codex does NOT snapshot—requires continuous Nightsoul state.
Gauge Theory
Maintain Cryo aura by balancing application (Kaeya's 2.5s intervals) with consumption (Mavuika's attacks). Rhythm: Cryo applies → Normal 1-2 (no Melt) → Normal 3 (Melt, consumes Cryo) → Cryo re-applies → Normal 4 (no Melt) → Charged (Melt, consumes Cryo) → Cryo re-applies.
4-6 Melted hits per Burst. Deviations (5-hit chains, delayed Charged) desynchronize timing, causing Pyro aura dominance (reverse Melt benefits Kaeya).
1U Cryo lasts 9.5s with decay. Mavuika's 1U Pyro consumes instantly on Melt. Kaeya's 2.5s interval creates 0.5-1.5s gaps without aura—precise timing required.
Pre-apply Cryo: Kaeya Burst → wait 2-3s → Mavuika Burst. Ensures Cryo exists at activation, guaranteeing first chain benefits from Melt.
ICD Management
Mavuika's ICD: 2.5s or 3 hits. Attack speed executes 4 hits in ~2.0s (hit-based trigger on 3rd). Charged Attacks have independent ICD.
Optimal: 4-hit chains + Charged Attacks. Triggers Melt every 1.5-2.0s. Alternative 2-hit chains + Charged (Melt every 1.5-2.0s) reduces total hits from 12-16 to 8-10, lowering overall damage by 10-15% despite higher Melt frequency.
ICD resets on Burst re-activation, but 7.5s duration prevents multiple casts. Manage within single Burst window.
Snapshot Mechanics
Bennett Burst: Snapshots on Mavuika Burst activation. Grants ATK for full 7.5s Crucible even outside circle. Allows aggressive positioning.
Obsidian Codex: Does NOT snapshot. Requires continuous Nightsoul state. Tap Skill activates for 6s, Burst extends via Crucible. Execute tap Skill → wait 1-2s → Burst for 6s buff covering 7.5s Burst.
Noblesse 4pc: +20% ATK for 12s after Burst. Bennett's Burst triggers, stacking with inherent buff. 12s exceeds rotation, allowing timing flexibility.
Kaeya Burst: 15s duration outlasts Mavuika's 7.5s window. Provides Cryo buffer for timing errors.
DPS Calculations
Mavuika avg Burst hit (2000 ATK, 70% CRIT Rate, 160% CRIT DMG, Serpent R1): ~45k before Melt, 67.5k Melted. 12 total hits (4-hit chains x3) with 5 Melts: (7 x 45k) + (5 x 67.5k) = 652,500.
Charged Attacks (3 per Burst, 60k base, 90k Melted): (1 x 60k) + (2 x 90k) = 240k.
Total single-rotation: 652,500 + 240k = 892,500 per 20s cycle.
10M HP Crab requires 11-12 cycles at 892,500 = 220-240s pure rotation. Adding setup (18-22s per cycle) + transitions (16-20s total) = 280-320s expected (4.7-5.3 min).
Realistic (accounting errors): 300-360s (5.0-6.0 min). Sub-300s = mastery-level. 360-420s = adequate investment, room for improvement.
Common Mistakes
Rotation failures: energy deficits (ER below thresholds), timing errors (Burst outside Bennett circle, before Cryo aura), mechanical misexecution (missed dodges, stamina depletion).
Melt consistency failures: Cryo gaps (Kaeya Burst expires mid-combo), Pyro aura dominance (Charged spam). Visual monitoring (elemental indicator) enables real-time detection.
Energy management collapses: executing Bursts on CD without verifying energy. Implement energy checks—pause 1-2s before Burst.
Melt Trigger Issues
Cryo gaps: Kaeya Burst expires (15s) before rotation completion. If setup >8-10s, Mavuika overlaps expiration. Solution: streamline setup to 6-8s max, or execute Kaeya Burst later (after Bennett).
Pyro dominance: Charged spam applies 2U Pyro, consumes 1U Cryo, leaves 1U Pyro. Subsequent hits trigger reverse Melt (Cryo on Pyro). Solution: limit Charged to 2-3 per Burst, intersperse with Normal chains.
ICD desync: 5+ hit chains cause 3rd/6th hits to Melt, missing 4-5, 7+. Solution: strict 4-hit discipline, Charged after 4th hit.
Positioning errors: Moving outside Kaeya's Glacial Waltz radius (~8m rotating circle). Solution: position centrally, let boss approach.
Timing Errors
Premature Burst: Activating outside Bennett circle wastes 30-40% damage. Solution: mental checklist—swap to Mavuika → confirm blue circle → Burst.
Delayed Charged Attacks: Wastes 0.5-1.0s per delay (2-4s total per Burst). Solution: pre-plan timing (after 4th Normal), trust stamina reserves.
Extended setup (>10s): Reduces rotations from 12 to 10-11 cycles. Each lost cycle = 892,500 damage. Solution: practice setup on Hilichurls, optimize to 6-8s.
Early cancellation: Swapping out when Cryo expires wastes 2-3s Burst time. Solution: continue attacking—non-Melted hits still deal 45k.
Mid-Rotation Fixes
Bennett shortfall: Skill spam 2-3x (2s CD, 4-9 Pyro particles). Delays Burst 4-6s but ensures ATK buff. Skipping reduces damage 40%.
Kaeya deficit: Skill spam (2-3 casts, 4-6 Cryo particles). If Burst unavailable, substitute Skill-only Cryo during Mavuika Burst (2-3 Melts vs 5-6).
Fighting Spirit <50%: Extend Kachina 3-5s, or Mavuika hold Skill for Flamestrider, or skip Burst (30-40% damage) while rebuilding.
Favonius procs: Build 30-40% CRIT Rate on Bennett for consistent procs (60% R5). Generates 3 neutral particles every 12s (1.8 energy to off-field).
Reset vs Adapt
Reset scenarios: (1) <70% boss HP by 150s, (2) 2+ rebuild phases, (3) character deaths reducing DPS 25%+. Fundamental failures unlikely to recover within 420s.
Adaptation scenarios: (1) single rebuild phase, (2) 65-75% HP at 150s (5-10% behind), (3) minor Melt issues (3-4 vs 5-6 optimal). Salvageable through tighter execution.
Decision framework: Calculate remaining time/damage. 200s left, 6M HP = 30k/s required. Your avg (892,500 per 20s = 44,625/s). If DPS exceeds by 20%+, continue. If short/matches, reset.
Psychological: reset after 2-3 min preserves focus. Failed attempts drain energy, increase errors.
Clear Examples and Benchmarks
Successful clears follow damage curves: 30% HP by 120s (first transition), 60% by 240s (second transition), 100% by 300-360s.
Example timeline: 0-20s (892,500 dmg, 91% HP) → 20-40s (892,500, 82%) → 40-60s (892,500, 73%) → 60-68s (transition) → 68-88s (64%) → continuing 11-12 rotations.
Investment levels:
- Minimal (Lv80, 4/6/6 talents, +16 artifacts, 50% CR, 130% CD): 380-420s
- Moderate (Lv90, 6/8/8, +20 artifacts, 65% CR, 150% CD): 320-360s
- Optimal (Lv90, 8/9/9, +20 good substats, 75% CR, 170% CD): 280-320s
Clear Analysis
High-performing clears: 18-20s cycles, minimal downtime. Success factors: (1) 6-8s setup via practiced swaps, (2) 100% Bennett uptime (180%+ ER), (3) 5-6 Melts per Burst via Cryo maintenance, (4) aggressive positioning minimizing dodges.
Patterns: Kaeya Burst → Bennett Burst → Mavuika Burst within 8s total. Position centrally, let boss approach. Monitor Cryo aura, adjust when expires.
Failed attempts: (1) 12-15s setup from hesitant swapping, (2) Bennett downtime (<160% ER), (3) 2-3 Melts from Cryo gaps, (4) excessive dodging (30-40% rotation time). Errors compound, extending beyond 420s.
Mechanical execution separates 300s from 360s more than investment. 65% CR with flawless rotations outperforms 75% CR with sloppy 360s clears.
Expected Times
Minimal (7M Mora, Lv80/90, 4/6/6, +16, Serpent R1, 50% CR, 130% CD): 380-420s perfect, 420+ with errors. 2-3 weeks farming.
Moderate (10M Mora, Lv90/90, 6/8/8, +20, Serpent R1, 65% CR, 150% CD): 320-360s good execution, 360-400s minor errors. 4-6 weeks farming. Comfortable clear threshold.
Optimal (15M Mora, Lv90/90, 8/9/9, +20 3-4 CRIT rolls, Serpent R5, 75% CR, 170% CD): 280-320s standard, 320-360s with errors. 8-12 weeks farming. Clear consistency + error forgiveness.
Whale (20M+ Mora, 9/10/10, +20 4-5 CRIT rolls, 5-star weapon, 80% CR, 200% CD): 240-280s. Trivializes Floor 12-2.
Alternative Strategies
Skill-focused: Tap Skill spam (7s CD) for Ring of Searing Radiance off-field Pyro when Fighting Spirit fails. Deals 30-40% Burst damage. Prevents rotation collapse when Kachina dies.
Cryo-carry pivot: Rosaria/Kaeya Main DPS with 4pc Blizzard Strayer, Cryo Goblet for reverse Melt. Deals 40-50% less than Mavuika Melt but salvages insufficient investment runs.
Shield-focused: Zhongli/Diona for damage mitigation when mechanics fail. Trades DPS slot (25-30% damage loss) for survival, allowing 380-420s clears vs failed attempts.
Mono-Pyro: Mavuika, Bennett, Xiangling, flex Pyro. No Melt = requires 20-30% higher investment. Eliminates Cryo dependency.
Resource Investment Priority
F2P allocation: Mavuika Burst to Lv8 > Obsidian 4pc correct main stats > Weapon to 90 > Mavuika to 90 > Artifact substats > Support talents > Support artifacts.
Talent priority: Lv8 Burst increases multipliers 40-50% vs Lv1. Skill/Normal upgrades provide 15-20%. 120 Purple Books + 18 Weekly Materials = 1200-1400 resin (6-7 days), yielding 40% damage increase.
Artifact efficiency: Obsidian domain guarantees 4pc within 20-30 runs (800-1200 resin, 4-6 days). Prioritize main stats (60-70% damage contribution) over substats (30-40%). Substat optimization after securing main stats.
Farm Order
Week 1-2: Obsidian domain for 4pc with correct main stats. 2-3 runs daily (120 resin) until acquiring ATK%/EM Sands, Pyro Goblet, CRIT DMG Circlet. Accept off-set Goblet.
Week 3-4: Talent materials for Burst to Lv8. 120 Purple Books (6 days Talent domain at 20/day) + 18 Weekly Materials (3 weeks bosses). Overlap weekly boss with artifact farming.
Week 5-6: Mavuika to 90, weapon to 90. Character: 420 Purple EXP Books + 2M Mora (3-4 days Ley Lines). Weapon: 300-400 materials (2-3 days weapon domain). 15-20% damage via base stats.
Week 7+: Optimize substats via continued Codex farming. Target 3-4 CRIT rolls per artifact. Diminishing returns (5-10% damage/week) but separates 320s from 280s clears.
Resin Efficiency
Resin hierarchy: Talent domains (40 resin for 4-6 Purple Books, 0.5-0.75% dmg/book) > Artifact domains (20 resin for 1-2 artifacts, 2-5% dmg/good piece) > Weapon domains (20 resin for 3-4 materials, 1-2% dmg/ascension) > Ley Lines (20 resin for 60k Mora or 5-6 EXP, 0.3-0.5% dmg/book).
Condensed Resin: 4 Condensed (160 resin) = 8-10 artifacts, 1-2 usable on average. Daily artifact farming (160 resin) for 5 days secures full +20 set with correct main stats.
Weekly boss priority: Mavuika's Burst material. 30 resin/kill (60 with double), 2-3 materials/kill. 18 materials for Lv8 = 6-9 kills (180-270 resin, 1-1.5 weeks).
Fragile Resin: Save 20-30 Fragile (1200-1800 resin) for artifact substat optimization after main stats secured. Accelerates 360s to 300s clears within 1-2 weeks vs 4-6 weeks.
Long-Term Value
Meta longevity: Pyro DPS role + Natlan synergies. Pyro consistently valuable for shields/reactions (Melt, Vape, Overload). Fighting Spirit future-proofs—new Natlan characters auto-synergize without re-investment.
Constellation value: C0 achieves 80-85% of C6 in Melt teams. C1 reportedly +10-15% damage, C2 +15-20%. F2P achieves full Abyss at C0—constellations optional.
Weapon comparison: Serpent R5 (5 BP, $50) provides 90-95% of 5-star performance at 10% cost. 15% gap = 30-40s clear time difference—meaningful for speedrunning, irrelevant for 36-star completion.
Opportunity cost: 15M Mora + 8-12 weeks delays other characters. But Main DPS role provides immediate Abyss value vs supports requiring synergistic teams. For F2P lacking strong Pyro DPS (Hu Tao, Arlecchino), Mavuika = optimal allocation.
FAQ
What's the optimal F2P Melt Mavuika rotation for Floor 12-2?
Mavuika tap Skill → Kachina Skill → Kaeya Skill + Burst → Bennett Burst + Skill → Mavuika Burst with 3-4 Normal chains + 2-3 Charged Attacks. 18-22s cycle maintains buffs and Cryo aura for 5-6 Melted hits, dealing ~892,500 damage per cycle against 10M HP Crab.
Which F2P weapon is best for Melt Mavuika in 6.2?
Serpent Spine (Battle Pass) provides optimal performance: 27.6% CRIT Rate + 30-50% DMG bonus, synergizing with Obsidian Codex's +40% CRIT Rate. Pure F2P: Fang of Mountain King (craftable) offers 11% CRIT Rate + 24% DMG, performing 5-7% below Serpent but fully accessible.
How much ER does Mavuika need for consistent rotations?
Zero ER—Fighting Spirit mechanic generates through Natlan teammates (Kachina) not energy particles. Supports need: Bennett 180-200% ER, Kaeya 160-180% ER for Burst uptime.
Can you clear 10M HP Crab with C0 Mavuika?
Yes. C0 achieves 300-360s clears with proper investment: Lv90, Talent 8/9/9, Obsidian 4pc with 65% CR/150% CD, Serpent R1 or Fang R5. Constellations provide 10-20% damage but unnecessary for 36-star completion.
Which Cryo support works best with F2P Mavuika Melt?
Kaeya for consistent Melt: 15s Burst duration, 2.5s Cryo intervals (6 applications/cycle). Rosaria for burst damage + CRIT Rate sharing (12% transfer), but 8s Burst creates gaps. Choose Kaeya for learning, Rosaria after mastering timing for 5-10% optimization.
What are common Mavuika Melt rotation mistakes?
(1) Bursting outside Bennett circle (loses 30-40% damage), (2) Bursting before Cryo aura (prevents Melt), (3) Charged spam causing Pyro dominance (reverses reactions), (4) insufficient ER (<180% Bennett, <160% Kaeya) causing Burst downtime, (5) extended setup (>10s) reducing rotations from 12 to 10-11 cycles.
Ready to unlock Mavuika's full potential? Top up Genesis Crystals at BitTopup for best rates and instant delivery. Secure pulls for constellations and weapons to dominate Spiral Abyss with exclusive deals and fast, secure transactions!


