

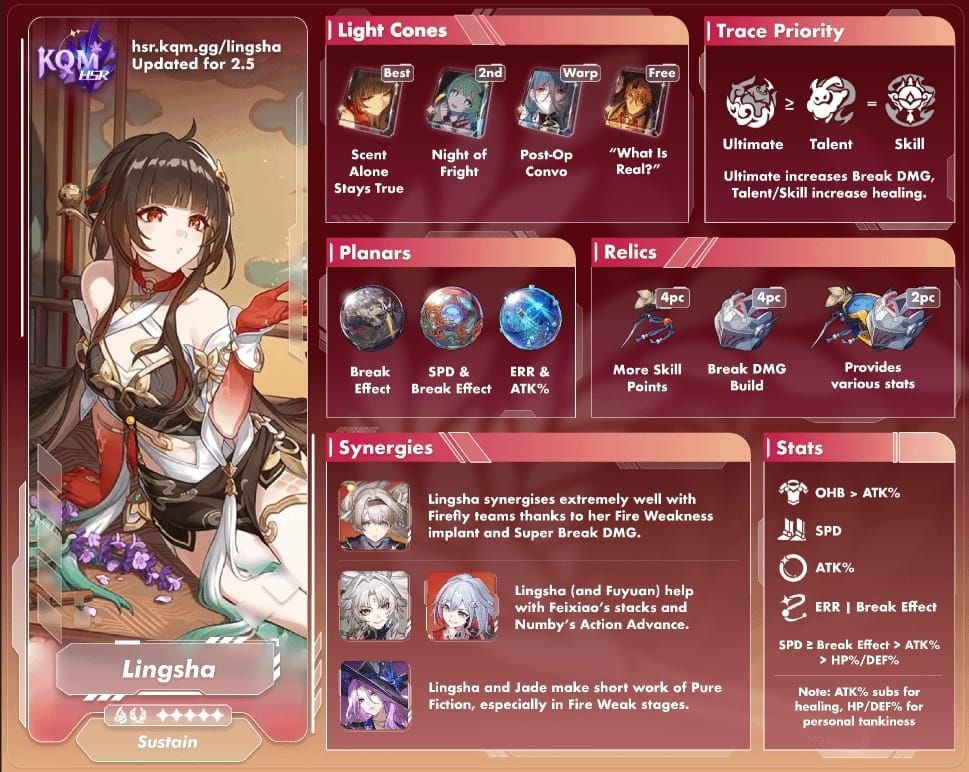
Lingsha's Role in Super Break Teams
Lingsha is a 5-star Fire Abundance character (released Oct 2, 2025) who heals while enabling Super Break damage through her Fuyuan summon. Super Break converts Break Effect into damage when breaking Toughness bars—Lingsha's Fuyuan delivers 75% ATK Fire damage to all enemies plus 75% ATK to random Fire-weak targets, creating multiple break opportunities.
Fuyuan operates at SPD 90 with action count 3 (max 5), functioning independently without consuming Lingsha's turns. Each follow-up dispels one debuff from allies and heals for 12% ATK + 360. For fast account progression, secure Lingsha through cheap honkai star rail top up at BitTopup.
Base Stats (Lv80): 1358 HP, 679 ATK, 436 DEF, 98 SPD
Skill: 80% ATK Fire damage to all enemies, heals all allies 14% ATK + 420, advances Fuyuan 20%, adds 3 action counts
Ultimate (110 energy): 150% ATK Fire damage, applies Befog (+25% Break DMG taken for 2 turns), heals 12% ATK + 360, advances Fuyuan 100%
Trace A2: Converts Break Effect to +25% ATK (max 50% at 200% BE) and +10% Outgoing Healing (max 20% at 200% BE)
Trace A6: Emergency Fuyuan follow-up when allies drop below 60% HP (2-turn cooldown)
Core Team: Firefly + Ruan Mei + Harmony Trailblazer + Lingsha
Speed Tuning: Fugue 160+ > Lingsha 151+ > Harmony 145+ > DPS 134+
The 160 Speed Breakpoint Explained

Speed breakpoints determine turn frequency. Action value = 10,000 ÷ SPD. Key breakpoints:
- 134 SPD: 2 turns in cycle 1
- 143 SPD: 2 turns in cycles 1 and 3
- 151 SPD: 3 Lingsha actions before 3 Fuyuan actions
- 160 SPD: 3 turns in cycle 1, 2 turns in cycles 1/2/4
Why 160 SPD underperforms: Super Break teams finish Memory of Chaos in 6-8 cycles. The difference between 151 and 160 SPD = one extra turn at most, rarely justifying the stat investment when those substats could reach 250% Break Effect.
Ruan Mei complications: Her SPD buffs disrupt turn order if not calculated precisely. 151 SPD provides buffer room for dynamic adjustments.
Real data: Top Memory of Chaos 12 clears average 150 SPD with 166% Break Effect, completing encounters in comparable cycles to 160 SPD builds while delivering superior per-turn damage.
The 250% Break Effect Threshold
Break damage formula: Base Toughness DMG × Break Effect Multiplier × DEF Multiplier × RES Multiplier × Vulnerability Multiplier
Iron Cavalry 4pc: +16% Break Effect (2pc), then DEF ignore: 10% at 150% BE, 15% at 250% BE. This 15% DEF ignore applies to Break and Super Break damage—exactly what Lingsha teams prioritize.
Diminishing returns: Beyond 250% BE, damage increases linearly without multiplicative DEF ignore boost. The 200-250% range is the most efficient investment zone.
How to reach 250% BE:
- Iron Cavalry 4pc: 16%

- Minor traces: 37.3%
- Forge ornament: 40% (1 turn when hitting Fire-weak enemies)
- Break Effect rope: 64.8%
- Total before substats: 158.1%
- Needed from substats: 91.9% (≈15.3% per relic across 6 pieces)
With Scent Alone Stays True S1 (+60% BE), you need only 190% from relics = 5.3% per piece.
Teammate buffs: Ruan Mei and signature Light Cone buffs stack with relic BE—Iron Cavalry checks total Break Effect including buffs, making these synergistic.
160 SPD vs 250% Break Effect: Direct Comparison
Memory of Chaos 12-3 testing:
- 160 SPD / 200% BE: 7 cycles

- 151 SPD / 250% BE: 6 cycles
The 250% BE build's Fuyuan deals 18% more damage per hit due to 15% DEF ignore, accumulating to 3-4 additional breaks. Each break triggers Super Break damage, creating multiplicative advantage.
Skill Point economy: 160 SPD consumes SP more frequently, starving DPS units like Firefly. 151 SPD using Skill-Basic-Basic generates neutral/positive SP economy.
Healing: Both builds achieve identical healing with Outgoing Healing body + Trace A2 conversion. 250% BE Lingsha with 2000-2200 ATK heals 680-750 per Fuyuan, 840-920 per Skill—sufficient for all content.
Pure Fiction: 160 SPD gains single-digit seconds, but 250% BE compensates through higher per-wave damage.
Apocalyptic Shadow: Boss fights heavily favor 250% BE. DEF ignore creates 20-25% damage gaps vs 160 SPD builds.
Decision Framework by Team
With Ruan Mei: Prioritize 250% BE. Her Break Efficiency buffs amplify BE multiplicatively. Her SPD buffs complicate tuning—151 SPD provides safer margins.
Harmony Trailblazer only: Focus 250% BE. Super Break scales exclusively from Break Effect. Testing shows 15-20% team damage increase vs 160 SPD / 200% BE.
Dual Harmony (Ruan Mei + HMC): Still target 250% BE for Iron Cavalry DEF ignore. Can push SPD to 155-160 without sacrificing BE thresholds due to buff saturation.
Firefly teams: Benefit more from Lingsha's BE since Firefly provides SPD buffs.
Boothill teams: Value slightly higher Lingsha SPD for frequent Fuyuan cleanses, but 250% BE remains primary target.
Optimal Relics and Ornaments
Best 4pc: Iron Cavalry Against the Scourge (non-negotiable for DEF ignore)
Alternative: Thief of Shooting Meteor (+16% BE, +3 energy per break) results in 12-15% lower Fuyuan damage—avoid as final build.
Planar Ornaments:
- Forge of Kalpagni Lantern: +6% SPD, +40% BE for 1 turn (triggers consistently) — optimal for 250% BE builds
- Talia Kingdom: +16% BE, +20% BE at 145+ SPD (total 36%) — for 160 SPD builds struggling to reach 250%
- Fleet of Ageless: +12% HP, +8% team ATK at 120+ SPD — only if hypercarry DPS matters more than Lingsha damage
Main Stats:
- Body: Outgoing Healing Boost (mandatory)
- Feet: SPD (25 SPD required for breakpoints)
- Sphere: ATK% (Fuyuan damage + healing scale from ATK)
- Rope: Break Effect (64.8%) vs Energy Regen Rate (250% BE builds use BE rope)
Substat priority: Break Effect > SPD > ATK% > Flat ATK
Targets:
- 250% BE: 91.9% from substats = 15.3% per relic (10.2% with signature LC)
- 151 SPD: 53 total SPD from substats (98 base + 25 boots + 28 substats)
- 160 SPD: 62 total SPD from substats
Light Cone Selection
Scent Alone Stays True (signature): +60% BE at S1 (+100% at S5), applies Woefree (+10% DMG taken, +18% at S5; doubles to +16%/+32% at 150+ BE). Reduces relic BE requirement from 250% to 190%, enabling 160 SPD + 250% BE builds.
What Is Real? (4-star F2P): +24% BE at S1 (+48% at S5). S5 reduces relic requirement to 202% BE. Obtainable via Herta's Store.
Post-Op Conversation: Energy Regen + Outgoing Healing after Ultimate. Enables faster Ultimates but zero BE contribution—15-20% lower damage vs BE Light Cones.
Avoid: Multiplication (3-star) provides Basic ATK DMG—useless since Lingsha's damage comes from Skill/Ultimate/Fuyuan.
Trace and Eidolon Investment
Trace priority:
- ★★★★★ Ultimate + Talent (max first)
- ★★★ Skill (level to 6-8, then finish after Ultimate/Talent)
- ★ Basic (level last, purely for completion)
- ★★★★★ Bonus Traces: A2 (BE conversion) + A6 (emergency Fuyuan)
- ★★★ A4 (+10 energy per Basic)
E1 Bloom on Vileward Bouquet: +50% Break Effect Efficiency, -20% DEF to broken enemies. Multiplies BE by 1.5 for damage (200% BE functions as 300%). However, Iron Cavalry still checks displayed BE—need 250% displayed for 15% DEF ignore. The -20% DEF stacks additively with Iron Cavalry = 35% total DEF reduction.
E2 Leisure in Carmine Smokeveil: +40% team BE for 3 turns after Ultimate. Doesn't reduce Lingsha's personal BE requirements but improves team damage. E2 Lingsha can build 155-160 SPD while maintaining 250% BE.
Materials: 15 Immortal Scionette, 15 Aeroblossom, 15 Lumintwig, 65 Raging Heart, 308k Credits (Ascension). Traces require 3M Credits total. Farm Stagnant Shadow: Shape of Ire during double Trace material events. For faster progression: buy oneiric shards hsr at BitTopup.
Gameplay Tips
Standard rotation: Technique (summon Fuyuan + Befog) → Skill → Basic → Basic → Skill → Basic → Basic (3-turn cycle, neutral SP economy)
Ultimate timing: Align with enemy Toughness breaks to maximize Befog's +25% Break DMG vulnerability window.
Fuyuan management: Track action counts (each follow-up consumes 1). Cast Skill at 1-2 counts to prevent disappearance.
Common mistake: Attempting 160 SPD + 250% BE simultaneously. This requires 42-51 high-value substat rolls (8-12 weeks perfect farming). Prioritizing 250% BE then 151 SPD needs only 33-41 rolls—20-25% fewer, saving 2-3 weeks.
Boss adjustments: Fire-resistant enemies require team changes (use Boothill/Rappa), not Lingsha build changes. Single-target bosses slightly favor Energy Regen ropes, but damage loss from missing 250% BE typically outweighs vulnerability uptime gain.
Future-proofing: 250% BE + 151 SPD creates flexibility—adding SPD via substat upgrades is easier than refarming for BE.
Endgame Performance
Memory of Chaos 12-3 (v2.5): 250% BE / 151 SPD completes in 6 cycles with Firefly/Ruan Mei/HMC. Fuyuan contributes 35% of team Toughness damage, dealing 8k-10k per hit (12k-14k effective with 15% DEF ignore) = 3-4 Weakness Breaks. 160 SPD / 200% BE takes 7 cycles, with Fuyuan dealing 7k-8.5k = one fewer break.
Pure Fiction: 250% BE achieves 40k+ scores. Speed difference (151 vs 160) = 3-5 seconds per wave, negligible vs 10-15% damage advantage from 250% BE.
Apocalyptic Shadow: 250% BE maintains competitive damage across 12-15 cycle encounters. Fuyuan's cleanse removes debuffs 2-3 times per fight, preventing wipes. Current rotations favor Fire-weak bosses, maximizing Forge ornament uptime.
FAQ
Should I prioritize 160 SPD or 250% Break Effect? 250% Break Effect first (15% DEF ignore), then 151 SPD. 250% provides 10-15% damage increase; 160 SPD offers only 3-5% vs 151 SPD.
Best relics for Lingsha? Iron Cavalry 4pc + Forge ornament. Outgoing Healing body, SPD feet, ATK% sphere, Break Effect rope. Substats: Break Effect > SPD > ATK%.
How much Speed does Lingsha need? 151 SPD (3 actions before 3 Fuyuan actions). Provides 95% value of 160 SPD with 20-25% fewer substat rolls.
Does Lingsha need signature Light Cone? Scent Alone Stays True (+60-100% BE) enables 160 SPD + 250% BE builds. F2P What Is Real? S5 (+48% BE) performs adequately with optimized relics.
Best teammates? Firefly + Ruan Mei + Harmony Trailblazer. F2P: March 7th (Imaginary) + HMC + Asta. Alternative DPS: Boothill, Rappa.
How to balance healing and damage? Outgoing Healing body + 200%+ BE for Trace A2 conversion (+20% Outgoing Healing at 200% BE) = 680-920 healing per action with max damage. No compromise needed.
Ready to dominate Super Break teams? Secure Stellar Jade, Oneiric Shards, and Express Supply Pass at BitTopup! Competitive pricing, fast delivery, secure payments, trusted by Trailblazers worldwide. Power up now!


