

Understanding NIKKE Simulation Room Overclock System
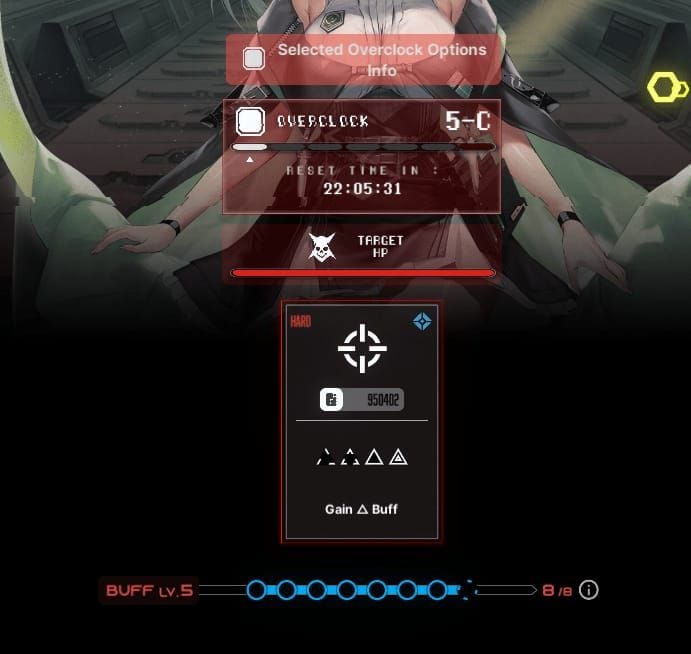
Overclock unlocks after clearing Sector 5-C. The defining mechanic: any Nikke at level 400+ gets locked to exactly level 400 during battles. Your maxed level 500 units perform identically to fresh level 400 characters, shifting advantage entirely to buff selection and team composition.
Core ratio caps at 50, but all rewards unlock at ratio 25—making it the optimal efficiency target. Rewards refresh bi-weekly (Tuesday 5:00 UTC+9).
For faster progression, nikke gem top up at BitTopup provides instant delivery with competitive pricing.
What Makes Overclock Different
Standard Simulation allows unlimited power scaling. Overclock caps combat power at level 400, forcing mastery of the buff chain system. Maximum 8 active buffs create a strategic puzzle where selection order and synergy determine success.
Ratio Scaling Mechanics
Each ratio increment increases enemy stats multiplicatively while your level 400 Nikkes stay static. At ratio 25, enemies have 40-50% more HP and deal 30-40% increased damage vs ratio 15. Boss HP thresholds trigger phases at 75%, 50%, and 25%, requiring sustained DPS.
Why Ratio 25 Matters
Ratio 25 unlocks the complete reward pool: premium skill books, substantial credits, and core dust. The difficulty spike separates casual play from strategic optimization. Players who understand buff chains clear this with minimal investment.
Bi-weekly rewards provide 15-20% more resources than standard Simulation. Core dust and high-tier skill books make this essential for mid-late game progression.
Buff Chain System Complete Breakdown
Maximum 8 active buffs with strict selection constraints. Buff Chain levels unlock through same-type stacking:

- Level 2: 3 buffs same type
- Level 3: Two separate 3-buff chains
- Level 4: 6 buffs same type
- Level 5: All 8 buffs same category
How Buff Selection Works
Buffs appear through node selection. SSR-tier buffs provide substantially higher stats than R/SR at Level 5. High-Quality Powder (SSR Level 5) grants 9.24% ATK. Epic-tier buffs offer unique mechanics but don't contribute to chain levels.
Key Buffs:

- High-Quality Powder: 9.24% ATK (SSR L5)
- Hidden Powder: 88.06% ATK additional damage on Full Charge (SSR L5)
- Impact Inducer: 12.74% Critical Damage (SSR L5)
- Homing Guider: 4.34% Critical Rate (SSR L5)
- Quick Charger: 17.64% charging speed (SSR L5)
- Drain Converter: 4.62% damage-to-healing (SSR L5)
- Chain Ammo: 12% chance to restore 53.9% ammo (SSR L5)
- Over Magazine: 63.63% ammo capacity (Epic L5)
- Quick Magazine: 63.63% reload speed (Epic L5)
Buff applicability varies by manufacturer, weapon type, and character. Hidden Powder targets charge-type weapons specifically.
RNG and Reroll Strategies
Node appearance follows weighted probabilities. Early nodes favor basic buffs; later sectors offer SSR/Epic options. Buff Legacy saves one non-Epic buff between runs (resets bi-weekly).
Reroll when first 3 nodes offer only defensive/incompatible buffs. Overclock costs no stamina—strategic resets waste only time.
Top-Tier Buff Combinations for Ratio 25
Optimal 8-buff setup:
- 3x High-Quality Powder
- 1x Impact Inducer
- 1x Homing Guider
- 1x Drain Converter
- 1x Chain Ammo
- 1x flexible utility
This achieves Buff Chain Level 5, providing 27.72% total ATK (9.24% × 3) plus Critical multipliers.
For charge-type teams (Scarlet, Modernia), substitute:
- 1x Hidden Powder
- 1x Quick Charger
To buy goddess of victory nikke gems, BitTopup offers secure transactions with excellent service.
Offensive Buff Chain: ATK + Critical Priority
Stack High-Quality Powder for max base ATK. Impact Inducer's 12.74% Crit Damage compounds multiplicatively with ATK increases. Teams with Alice, Scarlet maximize this synergy.
Chain Ammo's 12% chance to restore 53.9% ammo maintains DPS without reload downtime during burst windows.
Balanced Buff Chain: Survivability with Damage
Add Drain Converter's 4.62% damage-to-healing for passive sustain. Healing scales with damage dealt—1M damage per rotation = 46,200 HP healed. This single defensive slot improves consistency without sacrificing much damage.
Charge-Type Weapon Focus
Hidden Powder (88.06% Full Charge damage) + Quick Charger (17.64% charging speed) + High-Quality Powder creates specialized damage for Scarlet/Modernia teams. The 88.06% bonus stacks multiplicatively with base ATK increases.
Underleveled Unit Compensation Strategies
Level 400 lock creates unique environment where strategy compensates for stat deficits. Power deficit at ratio 25: 15-25% vs theoretical optimal stats.
Defining Power Deficit
Ratio 25 enemies have 40-50% more HP, deal 30-40% more damage vs ratio 15. Buff chains overcome 20-30% power deficits through multiplicative scaling. Manual control adds 10-15% effective damage through optimal positioning and burst timing.
Skill Investment Priority
Minimum for ratio 25:
- Core DPS abilities: Level 4
- Support skills: Level 3
- Burst skills: Level 4 (all members)
Optimal target:
- Primary DPS: Level 7
- Liter S2: Level 7 (team-wide burst generation)
Liter's S2 provides disproportionate value—single skill level increases Full Burst availability across entire team.
Equipment Optimization
Equipment type matching > enhancement levels. ATK-focused gear with Critical Rate/Damage substats. Manufacturer-matching equipment bonuses apply universally for mono-manufacturer teams.
Manual Control Techniques
- Position during boss AoE to avoid damage
- Sync bursts with vulnerability windows
- Prioritize high-threat targets in multi-enemy phases
- Use cover to interrupt enemy attacks
Ratio 25 Boss Mechanics
Boss phases trigger at 75%, 50%, 25% HP. Attack patterns follow predictable rotations with 2-3 second gaps—ideal damage windows.
Attack Patterns and Windows
Opening phase: Passive boss behavior, aggressive early DPS capitalizes on vulnerability.
Mid-fight (50% HP): Enhanced attack frequency, additional spawns. Focus primary DPS on boss while supports handle adds.
Final phase (25% HP): Maximum aggression, requires perfect burst timing or exceptional manual control.
Interrupt windows: 3-5 seconds after boss ultimates—bank burst skills for these moments.
Phase-Skip Strategies
Bank multiple burst skills for synchronized usage at thresholds. Dealing massive damage pushes bosses through multiple phases, skipping dangerous mechanics entirely.
Critical Burst Timing
- First Full Burst: Earliest activation to establish momentum
- Second Full Burst: Coincide with 50% HP threshold
- Final Full Burst: Phase-skip at 25% HP or emergency execution
Step-by-Step Clear Strategy
Pre-Battle Checklist
Team composition: Scarlet, Black Shadow, Tia, Naga, Liter (Alice/Modernia alternatives)
Equipment: ATK-focused gear, minimum +5 enhancement
Skills: Core DPS Level 4+, supports Level 3+, Liter S2 Level 7 recommended
Buff Selection Decision Tree
Node 1: Prioritize High-Quality Powder or ATK buff. Accept Impact Inducer/Homing Guider as secondary.
Nodes 2-3: Build toward Chain Level 2 (3 same-type). Mixed types = consider reset.
Nodes 4-6: Push toward Chain Level 4 (6 same-type) while adding synergy buffs.
Nodes 7-8: Finalize Chain Level 5 or fill with utility (Chain Ammo, Drain Converter).
Phase 1: Opening Rotation
First 30 seconds determine pacing. Aggressive early damage capitalizes on boss passivity. First Full Burst typically available 45-60 seconds in (sub-45s with Liter).
Phase 2: Mid-Fight
At 50% HP: Use first Full Burst before threshold (phase-skip) or save for add-clear after. AoE characters like Alice excel at clearing reinforcements.
Phase 3: Final Push
Enter 25% HP with second/third Full Burst ready. Manual control mandatory—auto-battle can't dodge enhanced patterns. Sync burst with vulnerability windows after boss ultimates.
Team Composition Guidelines
Core team: Scarlet (primary DPS), Black Shadow (sustained DPS), Tia (secondary DPS), Naga (DPS/utility), Liter (support)

Role Requirements
- Primary DPS: Scarlet, Modernia, Alice
- Secondary DPS: Black Shadow, Tia, Naga
- Support: Liter (burst generation)
- Healer: Consistent output over burst healing
- Flexible slot: Roster-specific optimization
Budget-Friendly Units
Tia: F2P accessible, strong ratio 25 performance
Naga: Solid DPS, accessible investment
Liter: Unmatched support, works at basic skill levels
Synergy Combinations
Pilgrim stacking: Modernia, Scarlet, Black Shadow, Redhood—universal buff applicability increases efficiency 20-30%
Charge-type focus: Scarlet + Modernia with Hidden Powder/Quick Charger
Burst acceleration: Liter + high-burst-cost DPS = rapid Full Burst cycling
Common Mistakes
Buff Chain Misconceptions
Defensive over-prioritization: Ratio 25 inverts survival logic—insufficient damage guarantees wipe regardless of defense. Limit to 1 Drain Converter.
Random selection: Each buff = 12.5% of total budget. Careless selection = double-digit effectiveness loss.
Epic over-prioritization: Multiple Epic slots prevent Chain Level 5, sacrificing superior SSR stat multipliers.
Timing Errors
Premature burst: Using ultimates before vulnerability windows wastes 30-50% damage potential.
Delayed burst: Allowing gauge to cap wastes generation.
Auto-battle during bursts: AI wastes abilities on suboptimal targets/timing.
Resource Waste
Excessive attempts with poor buffs: Reset within first 3 nodes when offerings prove suboptimal. Saves 10-15 minutes per failed attempt.
Wrong skill investment: Defensive skills provide minimal value vs DPS upgrades.
Suboptimal equipment enhancement: Verify stat priorities before enhancing.
Advanced Optimization
Frame-Perfect Timing
Boss ultimates feature 15-30 frame (0.25-0.5s) post-cast vulnerability. Activating bursts during these windows amplifies output 20-30%.
Charge shot release timing: Target stationary boss phases. Shots during movement risk missing.
Buff RNG Manipulation
Early assessment: Optimal starts have High-Quality Powder, Impact Inducer, or Homing Guider in first 2 nodes. Reset immediately if lacking.
Buff Legacy: Save High-Quality Powder between runs, guaranteeing strong ATK foundation.
Reset timing: Within 2-3 minutes when buff paths prove suboptimal.
Damage Breakpoints
ATK breakpoints: Additional % increases crossing whole-number values overcoming enemy defense.
Critical Rate: 40%, 60%, 80% = meaningful consistency thresholds. Below 40% = minimal Crit Damage value. Above 60% = max value extraction.
Critical Damage: Linear returns until ~200% total, then diminishing returns.
Phase-skip threshold: 25-30% boss HP in single Full Burst.
Weekly Efficiency
Clear within 24 hours of Tuesday 5:00 UTC+9 reset. Practiced execution reduces attempts from 15-20 min to 10-12 min, doubling attempts-per-hour.
Resource Investment
Minimum Viability
- DPS S1/S2: Level 4
- Burst skills: Level 4 (all)
- Supports: Level 3 (Liter S2: Level 7)
- Healers: Level 3-4
Material Sources
Skill books: Simulation Room rewards (ratio 25 clears provide books enabling future clears)
Credits: Interception, standard Simulation
Core dust: Ratio 25 clears (circular dependency—initial clear unlocks resources easing subsequent clears)
Cost-Benefit Analysis
Highest value: Liter S2 investment—universal utility across all content
Excellent returns: Scarlet skills—charge-type synergy with optimal buffs
Strong alternatives: Modernia, Alice—different buff profiles, both viable
Lower priority: Supports/healers until DPS reaches acceptable thresholds
Fast-Track with BitTopup
BitTopup provides secure, fast gem top-up with competitive pricing and instant delivery. Premium currency enables targeted character acquisition, skill book purchases, equipment materials.
Event passes offer exceptional resource-per-dollar value. Customer service excellence and secure transactions make BitTopup the trusted choice.
FAQ
What's the minimum power for Ratio 25?
Power level is irrelevant—level 400 lock caps all Nikkes at 400. Success depends on buff chains (3x High-Quality Powder, Impact Inducer, Homing Guider, Drain Converter, Chain Ammo), skill level 4+ on core abilities, and execution.
How do buff chains work?
Chain Level 2: 3 same-type buffs. Level 3: Two 3-buff chains. Level 4: 6 same-type. Level 5: All 8 same category. Higher levels provide multiplicative bonuses exceeding individual buff values.
Which buffs to prioritize?
High-Quality Powder (9.24% ATK) × 3, Impact Inducer (12.74% Crit DMG), Homing Guider (4.34% Crit Rate), Drain Converter (4.62% healing), Chain Ammo (53.9% ammo restore). Charge teams: add Hidden Powder (88.06% Full Charge damage), Quick Charger (17.64% charging speed).
Can underleveled units clear Ratio 25?
Yes. Level 400 lock equalizes all units. Requires optimal buffs, proper team (Scarlet, Black Shadow, Tia, Naga, Liter), skill level 4+, manual control. Buffs compensate 20-30% power deficit; execution adds 10-15%.
Best buff combinations?
3x High-Quality Powder, 1x Impact Inducer, 1x Homing Guider, 1x Drain Converter, 1x Chain Ammo, 1x flexible. Charge teams: substitute 1x Hidden Powder, 1x Quick Charger.
How much damage needed?
25-30% boss HP per Full Burst. Total encounter ≤3-4 minutes. Sustained DPS ~15,000-20,000/sec with optimal buffs and skill level 4+.
Ready to dominate Ratio 25? Secure NIKKE resources at BitTopup—instant gem delivery, competitive pricing, excellent service. Optimize your clears and maximize bi-weekly rewards today!


