

Mavuika Overload Fundamentals
Mavuika Overload teams trigger consistent Pyro-Electro reactions. Overload deals AoE Pyro DMG in 5m radius—Level 90 base damage 3978.85 before amplification. Unlike Vaporize/Melt, Overload scales exclusively with character level and EM, making support buffs critical.
Optimal Mavuika build: ATK% Sands, Pyro DMG Goblet, CRIT Circlet. Obsidian Codex 4pc provides base ATK 741, CRIT Rate 11%. Crimson Witch/Thundering Fury 4pc increase Overload DMG by 40%. Overload's 0.5s cooldown enables multiple reactions per rotation.
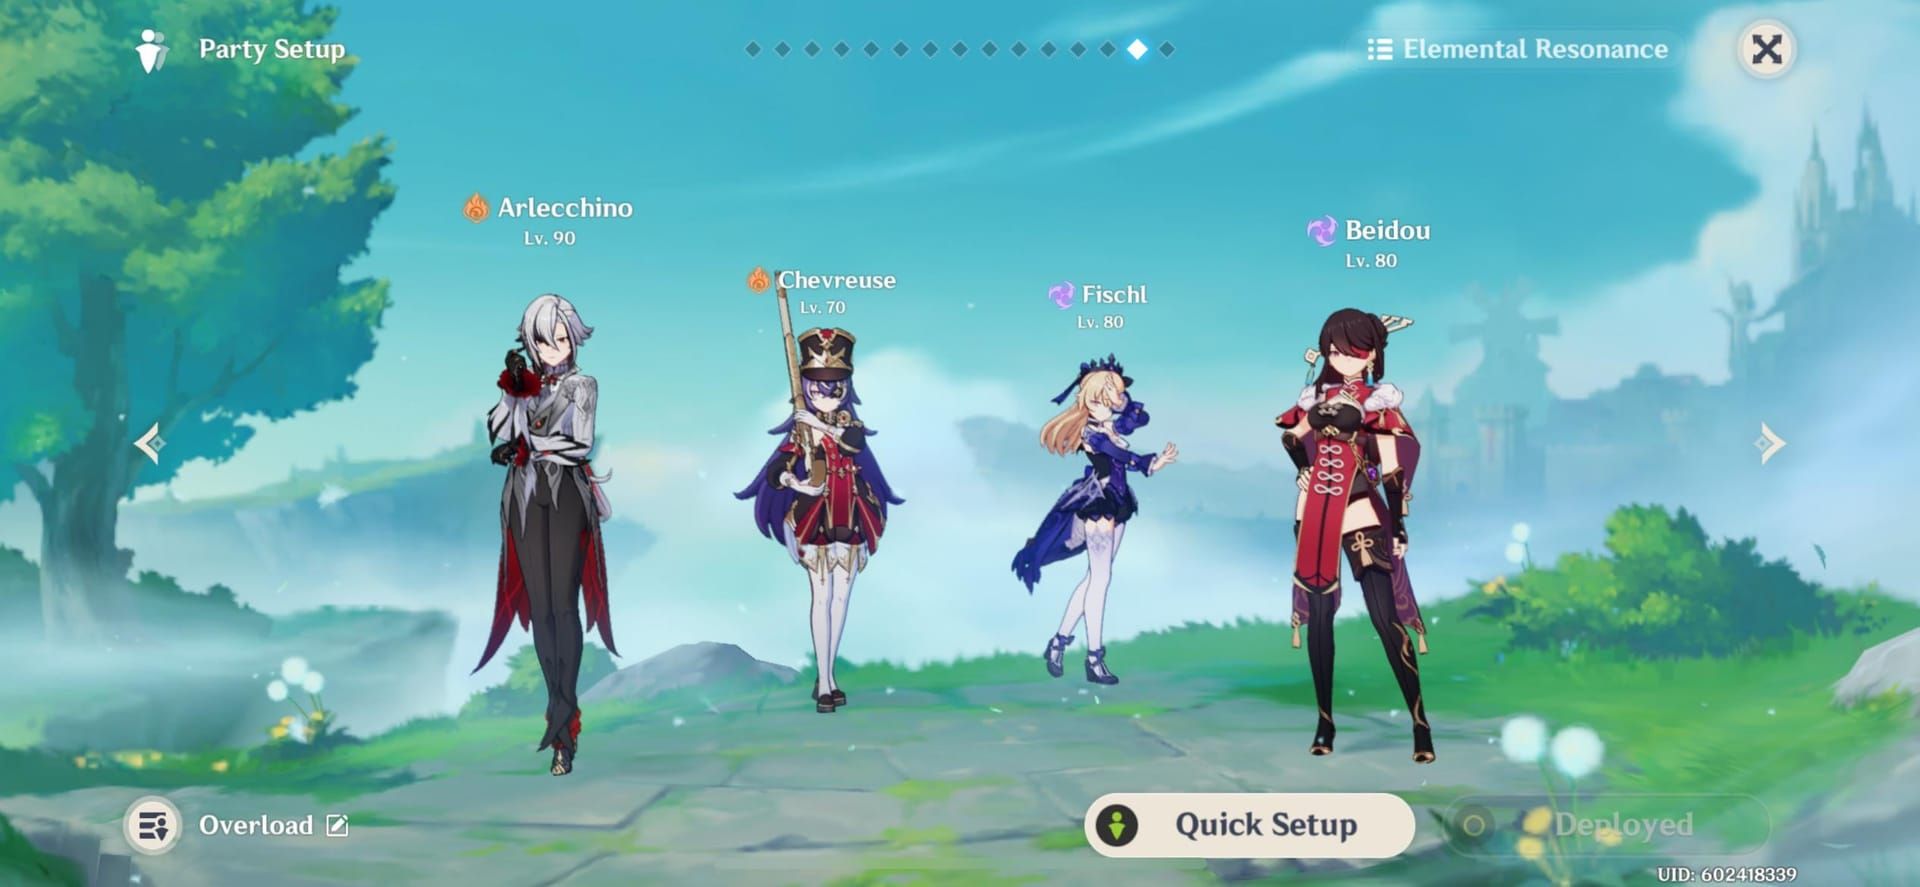
Core team structure:
- Pyro DPS: Mavuika
- Electro applicator: Ororon/Fischl
- Buffer/shredder: Chevreuse or Kazuha
- Healer: Bennett/Iansan
Support choice creates 30-50% damage variance in endgame content. Secure resources through Buy Genshin Impact Battle Pass at BitTopup for competitive pricing.
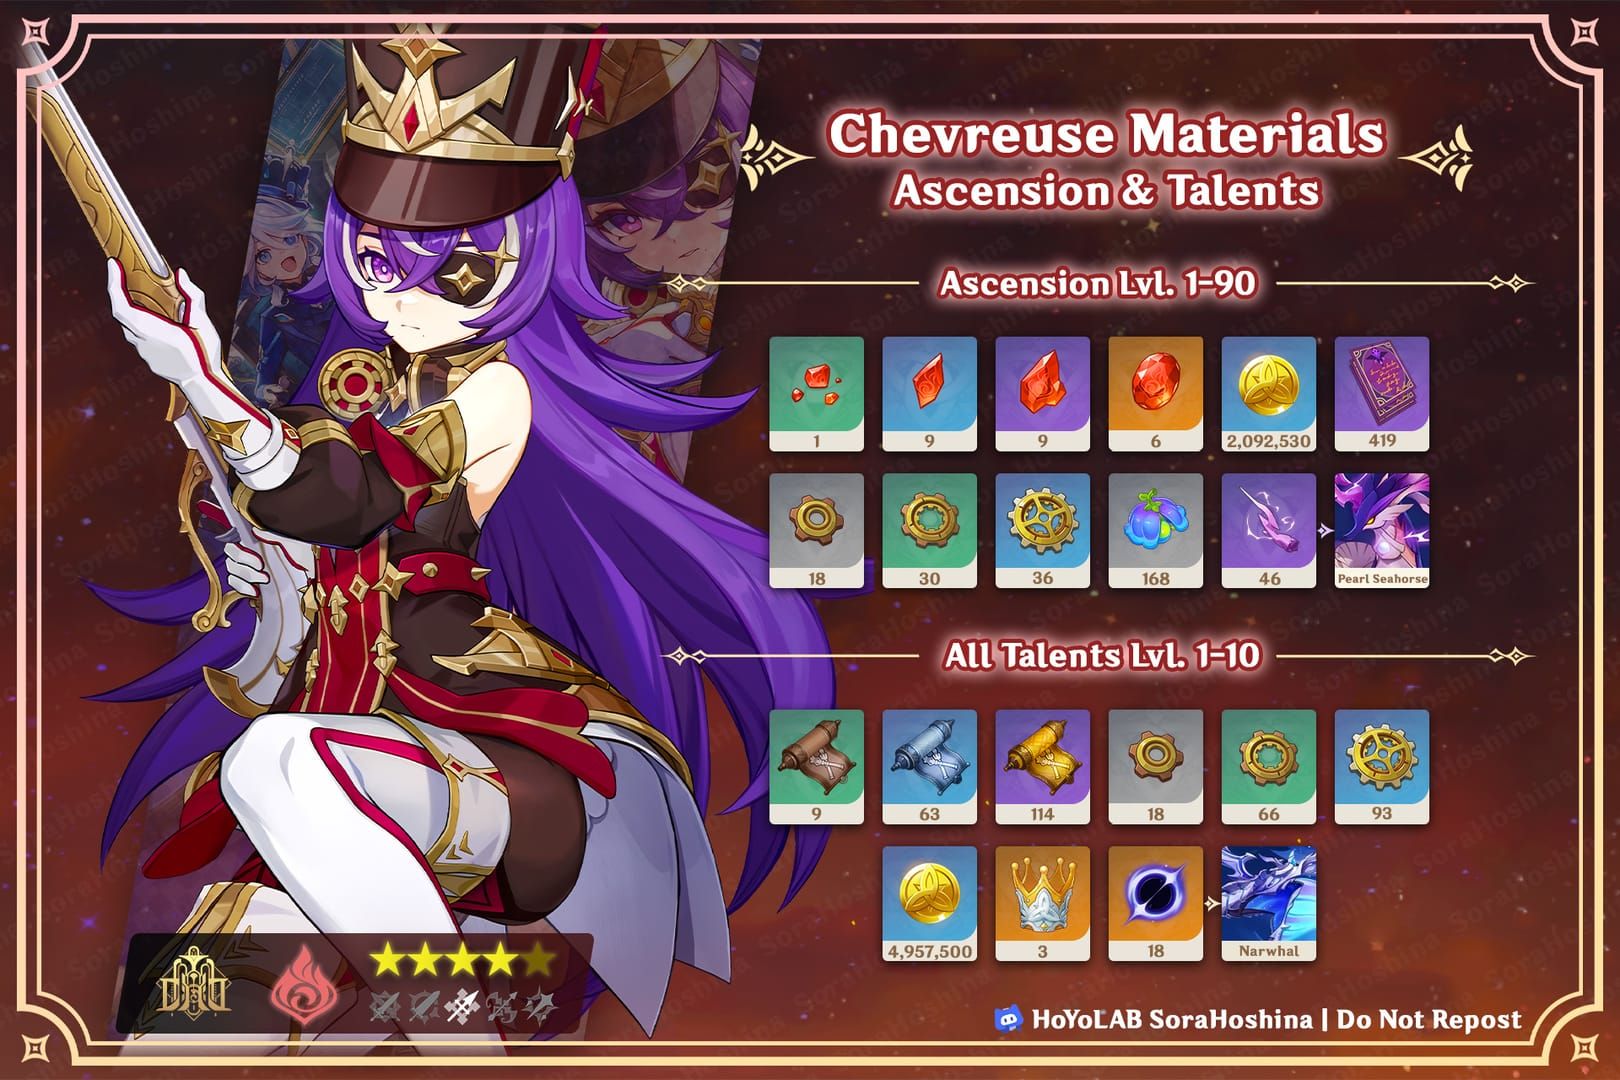
C6 Chevreuse Kit Analysis
Base stats (Lv90): HP 11962, ATK 193, DEF 605
Constellation progression:
- C0: 40% Pyro/Electro RES shred for 6s after Overload
- C4: Skill usable twice more (critical breakpoint)
- C6: 20% Pyro/Electro DMG bonus for 8s, stacks 3x (max 60%)
Skill damage: Press 115.2%, Hold 172.8%, Overcharged Ball 282.4% (15s CD)
ATK buff: 1% per 1000 Max HP, caps at 40% (30s duration). Requires 35k-40k HP.
Healing: Scales with Max HP through Burst (15s CD). Sufficient for Spiral Abyss at 35k+ HP but lacks Bennett's burst healing.
Optimal stats: HP%, ER 160-200%, HP flat substats. Talent priority: Skill > Burst > Normal. 4pc Noblesse Oblige for team ATK buff.
Kazuha Kit Analysis
A4 Passive: 0.04% Elemental DMG per EM point for 8s after Swirl. At 1000 EM = 40% Elemental DMG bonus.
C2: Grants 200 EM to party (significant for Overload damage).
VV 4pc: 60% Swirl DMG increase, 40% Elemental RES shred for 10s.
Crowd control: Skill pulls enemies together, optimizing AoE damage and Overload's 5m radius. Provides i-frames during Plunge.
Build requirements: 1000 EM (Sands/Goblet/Circlet), VV 4pc mandatory, ER 190-200% as solo Anemo. Weapons: Iron Sting/Freedom-Sworn.
Access premium resources through Cheap Genesis Crystals at BitTopup.
C6 Chevreuse Variant
Team: Mavuika, Ororon, Chevreuse, Bennett (or Iansan)
Rotation:
- Mavuika Skill Tap (Pyro aura)
- Ororon Skill → Burst (Electro application)
- Chevreuse Skill Hold (trigger Overload, activate RES shred)
- Bennett Burst (ATK buff)
- Mavuika on-field DPS (continuous Overload)
Damage output: 60% DMG bonus + 40% RES shred + Bennett ATK buff. Against 10% base resistance enemies, shred reduces to -30% (1.15x multiplier). Total damage increase: ~45-55% over baseline.
Execution difficulty: Moderate. Must time Chevreuse Hold after Ororon's Electro. Buffs refresh with each Overload (forgiving).
Kazuha Variant
Team: Mavuika, Ororon, Kazuha, Bennett
Rotation:
- Ororon Skill (Electro)
- Mavuika Skill Tap (Pyro)
- Kazuha Skill (Swirl Pyro, activate VV + A4)
- Bennett Burst
- Ororon Burst
- Mavuika on-field DPS
Advanced: Double swirl both Pyro/Electro for dual buffs (requires precise timing).
Damage output: 40% DMG bonus + 40% VV shred + Bennett ATK buff. Single-target: 5-15% lower than C6 Chevreuse. Multi-target: grouping reverses advantage.
Execution difficulty: High. Precise Swirl timing required. Double swirl demands frame-perfect inputs. ER management critical (190-200%).
Head-to-Head Comparison
Single-target: C6 Chevreuse wins by 5-15%. 60% DMG bonus vs 40% (both have 40% shred). With 46.6% Pyro Goblet: Chevreuse 106.6% total vs Kazuha 86.6% = ~13.6% final damage difference.

Multi-target: Kazuha wins via grouping. 3+ enemies grouped = effective damage multiplication exceeds Chevreuse's percentage advantage.
Spiral Abyss 12: Similar clear times overall. Boss chambers favor Chevreuse; scattered enemy chambers favor Kazuha.
Resistance math: Both provide 40% shred (identical multiplier). Difference = DMG bonus only.
Investment Cost Analysis
C6 Chevreuse cost: 30k-50k primogems average (7 copies from C0). Major breakpoints: C4 (+10-15% damage), C6 (+25-35% over C4).
Kazuha cost: 12k-14k primogems (C0 5-star). Immediate value at C0. Artifact farming: 3k-5k resin for 1000 EM + ER.
Long-term value:
- Kazuha: Universal across Freeze/Vaporize/Overload teams
- C6 Chevreuse: Pyro-Electro exclusive
C2 Kazuha: 200 EM party buff (strong for Overload) but requires 5-star constellation investment.
Situational Advantages
C6 Chevreuse excels:
- Single-target bosses (Ruin Serpent, Mechanical Array)
- Extended combat (easier buff maintenance)
- Bennett-free comps (frees Bennett for 2nd team)
- Players preferring simpler rotations
Kazuha excels:
- Multi-target with mobile enemies
- Scattered spawns (Treasure Hoarders, Hilichurls)
- Players with existing Kazuha investment
- QoL: crowd control + i-frames
F2P recommendation: Prioritize Kazuha. C0 value + universal applicability > C6 Chevreuse specialization.
Whale optimization: Both. C6 Chevreuse for single-target, Kazuha for multi-target. C2 Kazuha adds 200 EM party buff.
Alternative Options
C0 Chevreuse vs C0 Kazuha: Kazuha wins. 40% DMG bonus + VV shred + crowd control > C0 Chevreuse's shred + ATK buff.
Budget team: Mavuika, Fischl, Sucrose, Bennett. Achieves 70-80% of optimized performance with one 5-star.
Other Anemo:
- Sucrose: EM sharing + VV (budget option)
- Venti: Extreme CC but less damage amp
Common Misconceptions
Myth: Overload knockback ruins DPS Reality: Floor 12 enemies resist knockback. Small enemies stay within 5m radius.
Myth: Chevreuse only works at C6 Reality: C0 provides 40% shred + ATK buff (viable). C6 optimizes, not enables.
Myth: Kazuha always best Reality: C6 Chevreuse outperforms in Pyro-Electro specialization. Best depends on scenario.
Practical Tips
Rotation optimization:
- Chevreuse: Hold immediately after Ororon Electro (1-2s delay = 5-10% damage loss)
- Kazuha: Apply elements right before Swirl (prevent aura decay)
Energy management:
- Chevreuse: Prioritize Skill Hold for particles
- Kazuha: Favonius Sword reduces ER to 160-180% (vs 190-200% with Iron Sting)
Positioning: Center Mavuika in enemy clusters for 5m Overload radius. Kazuha auto-groups; Chevreuse requires manual positioning.
Final Verdict
Is C6 Chevreuse essential? No, but provides 5-15% single-target optimization.
Damage summary:
- C6 Chevreuse: +5-15% single-target
- Kazuha: Comparable multi-target via grouping
Investment priority:
- F2P/low-spender: Kazuha (universal value)
- Pyro-Electro mains with Kazuha: Consider C6 Chevreuse
- Whales: Both (scenario-dependent selection)
Pull C6 Chevreuse if you:
- Primarily run Pyro-Electro teams
- Already own Kazuha
- Focus on boss optimization
- Prefer simpler rotations
- Need Bennett for 2nd team
Budget alternatives (Fischl/Sucrose/C0 Chevreuse) clear all content at 70-85% optimized performance.
FAQ
Is C6 Chevreuse worth pulling? For Pyro-Electro specialists, yes (5-15% gain). Not essential—Kazuha achieves comparable overall performance with better versatility.
How much damage does C6 add? ~45-55% total increase over baseline Overload teams (60% DMG bonus + 40% shred combined).
Can Kazuha replace Chevreuse? Yes. 85-95% of C6 Chevreuse's single-target damage with superior crowd control and multi-target performance.
Does Chevreuse need C6? No. C0 provides 40% shred + ATK buff (functional). C6 optimizes significantly but isn't required.
Best rotation? Mavuika Skill → Ororon Skill/Burst → Chevreuse Hold → Bennett Burst → Mavuika DPS.
Better F2P support? Kazuha. C0 effectiveness + universal teams > C0 Chevreuse's niche value.
Ready to optimize your Mavuika team? Get primogems for C6 Chevreuse or Kazuha at BitTopup! Instant delivery, secure transactions, exclusive discounts. Top up now!


